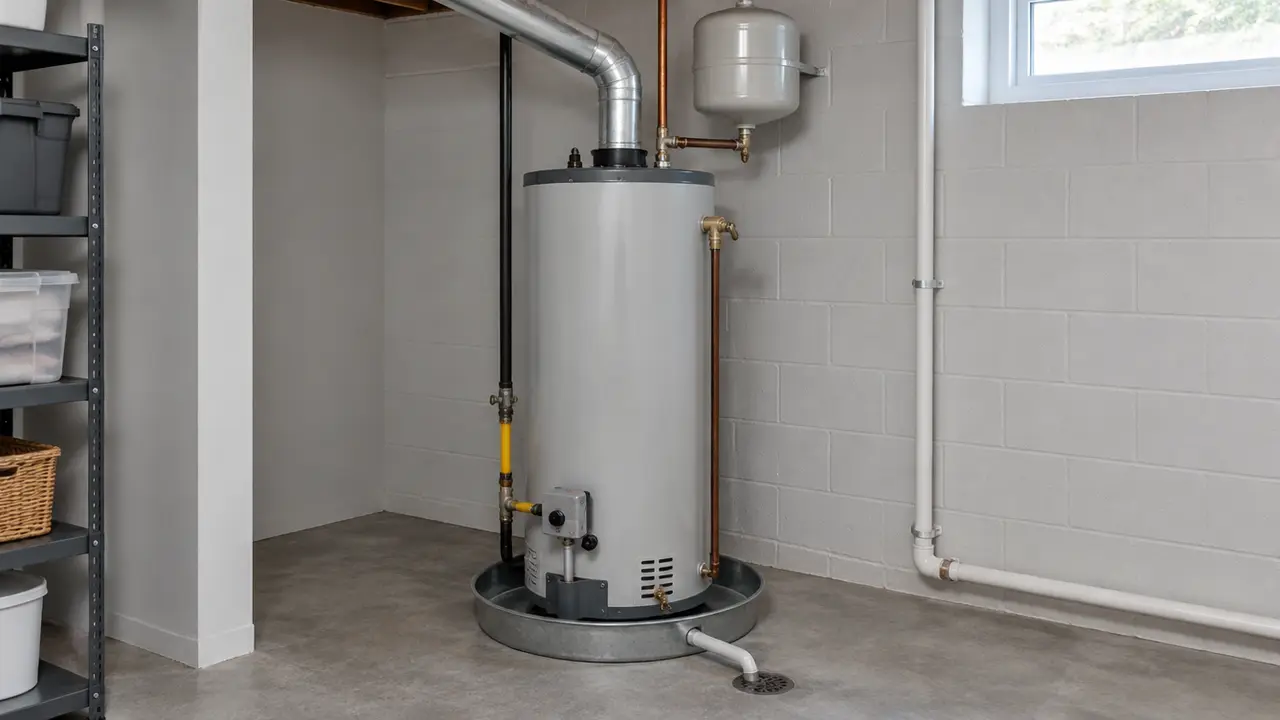
A proper hot water tank installation drains and removes the old tank, sets the new one level on a suitable base or drain pan, connects water with shut-off valves and heat traps, pipes the T&P valve to a safe drain, controls thermal expansion, connects and leak-tests the gas or wiring, checks venting and draft, fills the tank before powering it, sets the temperature and closes the permit.
- Gas water heater work needs a gas permit and a qualified gas fitter in most of Canada; rules on who may pull the permit vary by province.
- The T&P valve discharge pipe must be at least the valve's outlet size, rigid, sloped down, unthreaded at the end and end over a drain or safe spot.
- An electric tank must be full of water before power is turned on, or the elements can burn out in seconds.
- Every gas install should end with a draft or combustion check and a working carbon monoxide alarm nearby.
- A good written quote lists the model, first-hour rating, venting, expansion control, permit, haul-away and warranty.
01 /What happens during a hot water tank replacement?
A like-for-like tank replacement usually takes an installer a few hours; a change of type, such as moving to a power vent, tankless or heat pump unit, can take a day or more. The sequence below is what a careful installer does. It is written so you can recognise a thorough job, not as instructions for doing gas or electrical work yourself: the can I replace my own water heater guide covers what homeowners may legally do.
- Shut down safely
Turn the gas control to off and close the appliance gas valve, or switch off the breaker for an electric tank. Close the cold water supply.
- Drain and disconnect
Open a hot tap to break the vacuum, drain the tank to a floor drain through a hose, then disconnect the water lines, the gas connector or wiring, and the vent connector.
- Remove and inspect
Take the old tank out and look at the floor, the drain pan if any, the vent and the chimney connection for corrosion, soot or water damage.
- Set the new tank
Place it level on a sound base, in a drain pan where required, with clearances from the manufacturer's label, and with seismic straps where local code calls for them.
- Connect water
Use a shut-off valve on the cold inlet, unions or flexible connectors, dielectric protection where metals meet, and heat traps if the tank lacks built-in ones.
- Pipe the T&P discharge
Run a rigid discharge pipe from the temperature and pressure relief valve down to a floor drain or other safe location, as described below.
- Control thermal expansion
Add an expansion tank or other approved means where a check valve, backflow preventer or pressure-reducing valve closes the system.
- Connect fuel and venting
Gas: connect with an approved connector and a sediment trap, then leak-test every joint. Vent: secure, correctly sloped connector to a sound chimney or a new sidewall vent. Electric: confirm the circuit and breaker suit the elements.
- Fill, then fire
Fill the tank completely and bleed air from a hot tap before lighting the burner or turning on power.
- Commission and test
Check for leaks, confirm draft at the draft hood or fan operation, set the temperature, check the mixing valve if fitted, and test the carbon monoxide alarm.
- Paperwork and haul-away
Arrange inspection under the permit, register the warranty, leave the manual, and remove the old tank.
02 /How must the T&P valve discharge be piped?
The temperature and pressure (T&P) relief valve is the tank's last line of defence against overheating or over-pressure, so its discharge pipe has strict rules. The 2025 edition of the National Plumbing Code of Canada, the model code that provinces adopt on their own schedules, says discharge pipes from temperature- and pressure-relief valves must:
- be at least the same nominal pipe size as the valve's outlet;
- be rigid, slope downward from the valve, and end with an indirect connection above a floor drain, sump or other safe location, with an air break of not more than 300 mm;
- have no thread at the outlet, so nobody can cap it; and
- be able to operate at a temperature of at least 99 °C.
The same code says no shut-off valve may be installed between the tank and the relief valve or on the discharge pipe, and its explanatory note adds that where the discharge pipe is longer than 2 m or uses more than two 90° elbows, the valve manufacturer's instructions should be followed so the piping does not restrict discharge. A T&P valve that drips is telling you something; see T&P valve dripping before assuming the valve is faulty.
03 /What else should the installer check on a gas water heater?
On a gas water heater the installer should verify the gas supply, combustion air, venting and carbon monoxide safety, because these are what make a gas tank dangerous when done badly.
- Gas line size and leak test. The existing line must carry the new heater's input alongside the furnace and other appliances. Every joint is leak-tested before lighting.
- Sediment trap. A short capped leg before the gas control catches debris in the gas line; it is standard practice and often required by the manufacturer.
- Venting. On a chimney-vented tank, the vent connector must rise toward the chimney, be secured at every joint and keep clearances to combustibles. If the furnace no longer shares the chimney, the chimney may be too large for the water heater alone; the venting and backdraft guide explains the fix.
- Combustion air. A conventional tank burns house air. In a tight house or a closed mechanical room, there must be enough air for combustion and draft.
- Draft check. After the burner has run for a few minutes, the flue gases should be drawn into the draft hood, not spilling out around it.
- Garages. Where a gas tank is installed in a garage, codes and manufacturer instructions address protection from flammable vapours and vehicle impact; ask how your installer is meeting them.
Finish with a carbon monoxide alarm near sleeping areas. Natural Resources Canada's Water Heater Guide recommends at minimum a carbon monoxide sensor in the vicinity of all combustion appliances and notes this is required by building code in many Canadian jurisdictions. In Ontario the Fire Code requires CO alarms in homes with a fuel-burning appliance.
04 /What is different about installing an electric or heat pump tank?
An electric tank has no venting or gas line, so the critical items are the circuit and the order of operations. The breaker and conductors must suit the element wattage on the rating plate. Most important, the tank must be completely full before power is restored: an element energised in air burns out almost immediately, which is one of the most common day-one failures.
A heat pump water heater adds three checks: a condensate drain from the unit to a floor drain or pump, enough room air volume or ducting as the manual specifies, and service clearance above for the heat pump module. The National Plumbing Code of Canada also requires the thermostat of electric storage-type water heaters to be set at 60 °C, and its explanatory note connects that to controlling Legionella growth in stratified electric tanks.
05 /Where should a water heater go, and does it need a drain pan?
Put the water heater where a leak will do the least damage, close to a floor drain, near the chimney or an outside wall for venting, and ideally close to the main hot water uses. Natural Resources Canada notes that sidewall-vented and electric heaters free you from the chimney, so relocating closer to the bathrooms and kitchen can shorten pipes and save energy and water.
The National Plumbing Code of Canada (2025 edition) requires a corrosion-resistant watertight drain pan where a storage-type water heater is located in a ceiling or roof space or over a floor of wood construction. The pan must be at least 50 mm larger than the tank with sides at least 25 mm high, and drain to a floor drain or other acceptable location through a pipe two sizes larger than the relief valve discharge pipe. Your province's adopted code edition applies, so confirm locally.
A tank on a basement slab does not need a pan under that rule, though many owners add one, and a leak detector alarm is a cheap addition. Tanks should sit level: a noticeable tilt stresses connections and can affect venting. Water heater leak protection covers pans, alarms and automatic shut-off valves in more detail.
06 /What should a hot water tank installation quote include?
A good quote states exactly what you are buying and what work is included, so you can compare installers like for like. Natural Resources Canada's Water Heater Guide lists what a written contract should include: the manufacturer, model and heating capacity; warranty details; installation details such as venting and inspections; additional parts such as heat traps, drain pan, chimney liner, piping and insulation; removal of the old heater; the total cost of parts and labour with taxes; payment method; and start and finish dates.
| Item | What to look for |
|---|---|
| Model and rating | Fuel, size, first-hour rating, UEF |
| Venting | Existing chimney reused and checked, or new vent with route and termination |
| Expansion control | Expansion tank or other means, if the system is closed |
| T&P discharge | New rigid discharge pipe to a drain |
| Gas or electrical | Connector, sediment trap, leak test; or circuit check |
| Permit and inspection | Who pulls the permit, and that the fee is included |
| Extras | Drain pan, mixing valve, seismic straps, CO alarm |
| Removal | Haul-away and disposal of the old tank |
| Warranty | Tank warranty length plus the installer's labour warranty |
| Job | Typical installed range |
|---|---|
| Electric tank, like-for-like | $1,500–$3,000 |
| Atmospheric gas tank, like-for-like | $2,000–$3,500 |
| Power vent gas tank | $3,000–$5,000 |
| Add expansion tank during install | $200–$500 |
| Add thermostatic mixing valve during install | $250–$600 |
Ready to compare prices? Describe your current tank, fuel and venting in a quote request and installers can price the same scope. Who installs water heaters explains which licences each part of the job needs.
FAQQuestions people ask
How long does it take to install a hot water tank?
A like-for-like replacement typically takes a few hours. Converting to a power vent, tankless or heat pump unit, or adding a new gas line or circuit, can take a full day or more.
Can a hot water tank sit directly on a concrete floor?
Yes, most tanks can sit on a level concrete slab; follow the manufacturer's instructions. A drain pan is required by the National Plumbing Code where a tank is over a wood floor or in a ceiling or roof space.
Does a hot water tank need to be level?
It should be level or very close to it. A tilted tank stresses the water and gas connections and can affect how a chimney vent connector rises.
Does a new water heater need an expansion tank?
It does when a check valve, backflow preventer or pressure-reducing valve makes the water system closed, because heated water then has nowhere to expand. The expansion tanks guide explains how to tell.
Is a permit needed to replace a hot water tank?
Often, especially for gas work, and always check. In Calgary, for example, the City says a permit is required when the gas line upstream of the shut-off, the venting or the type of heater changes. See the permits and code guide.
What happens to my old water heater?
Most installers remove and dispose of it; confirm haul-away is in the quote. If the tank is rented, the rental company may need to collect it, so check your agreement first.